

Measuring for blackout curtains comes down to two calculations — the width that creates fullness and closes light gaps, and the length that stops exactly where you choose — and this guide delivers both as arithmetic you can run on your own window in five minutes. The measuring most guides teach stops at the rod; blackout measuring starts there, because a blackout curtain sized like a decorative one leaks light at every edge it was supposed to seal. Every figure below comes from published retailer measuring standards and the U.S. Department of Energy’s window-covering guidance, and the worked example near the end runs one real window through the whole sequence.
The Width Math
Width is three numbers multiplied and divided, in order.
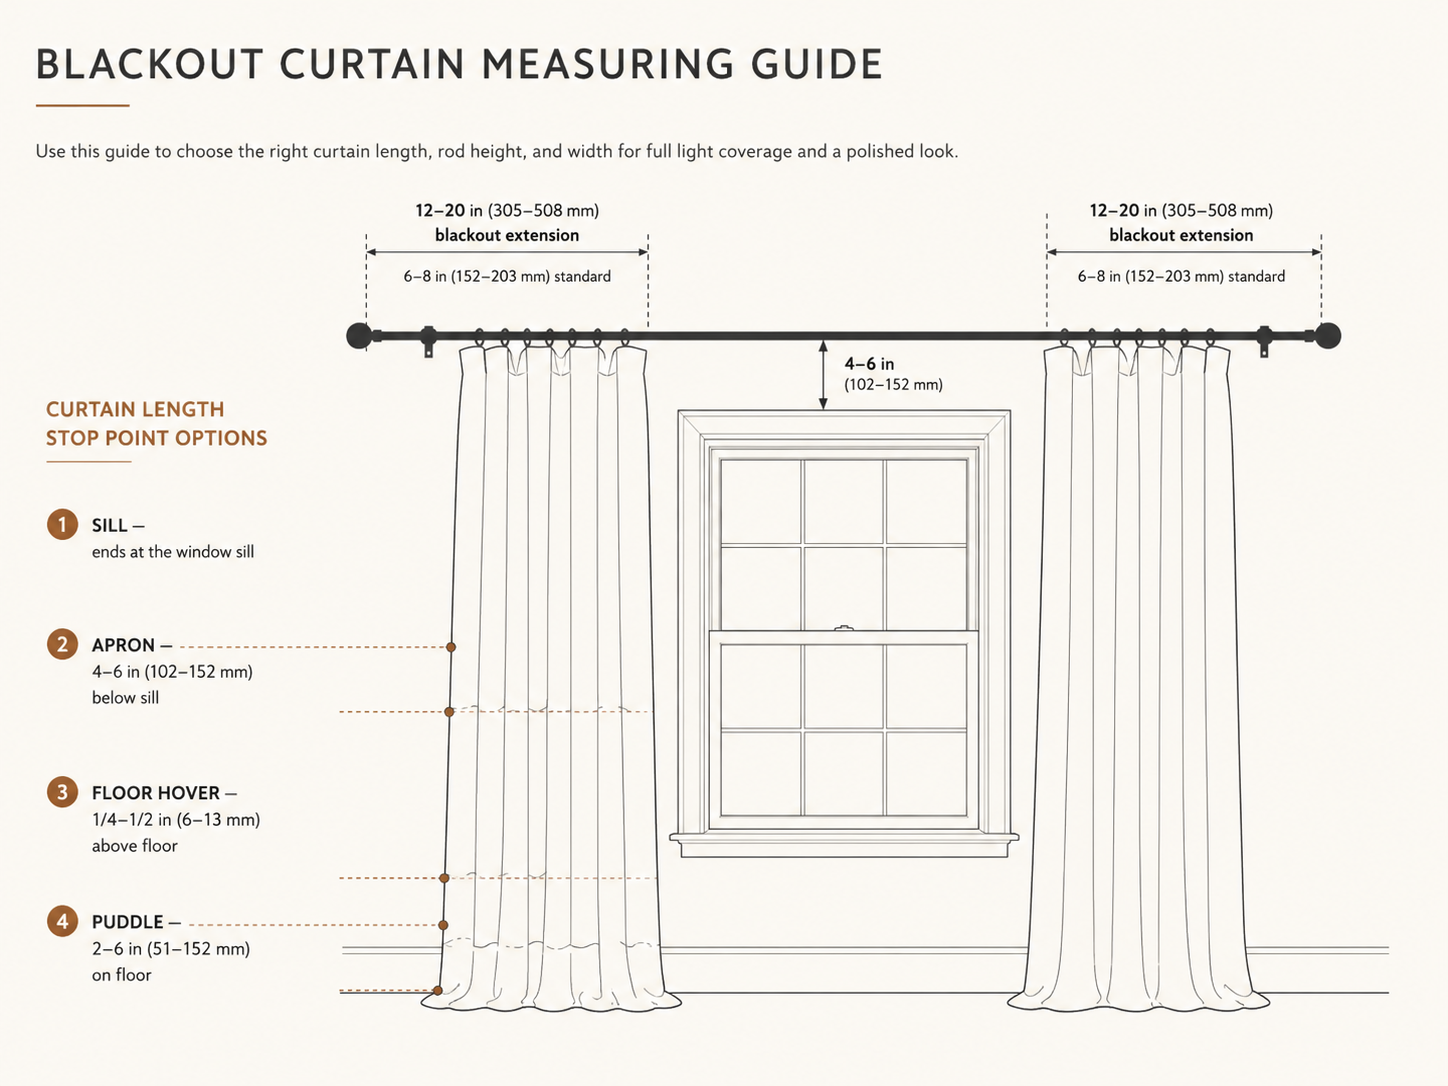
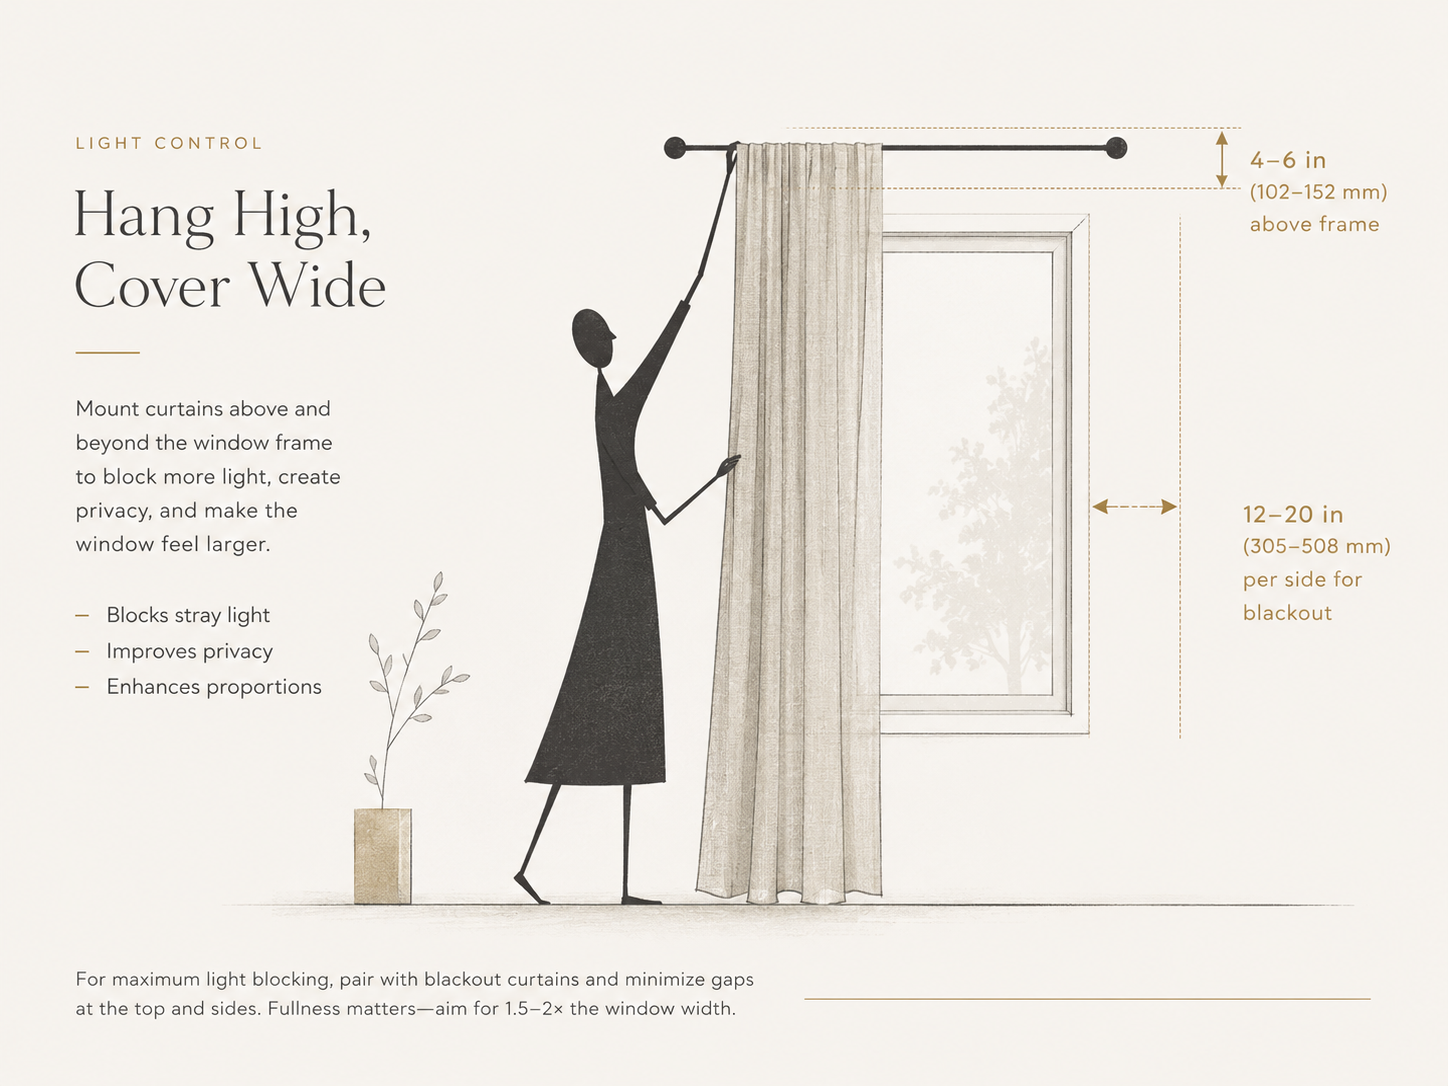
First, the rod. A standard installation extends the rod 6 to 8 inches past the window frame on each side. Blackout work extends further — 12 to 20 inches per side where full light control matters — because the extra run lets open curtains stack clear of the glass and closed curtains wrap the window in fabric that light cannot slip behind.
Second, fullness. Total fabric width equals rod length multiplied by a fullness ratio: 1.5 times is the tailored minimum, 2 times is the standard that reads properly full, and 2.5 to 3 times gives the luxury gather of pleated drapery. The header sets a ceiling on this number — back-tab and tab-top curtains max out around 2 times because the tabs restrict gathering, rod pockets take up to 3 times, and pinch pleats arrive pre-pleated, so you order the rod width and the fullness is already sewn in. Blackout fabric is heavy, and 2 times fullness in a triple-weave panel hangs with more body than 2 times in a sheer.
Third, panels. Divide total fabric width by the number of panels — two for nearly every window, parting at center. A useful shortcut for grommet panels: two standard panels cover about 40 inches of rod handsomely, so count 40-inch increments and buy pairs.
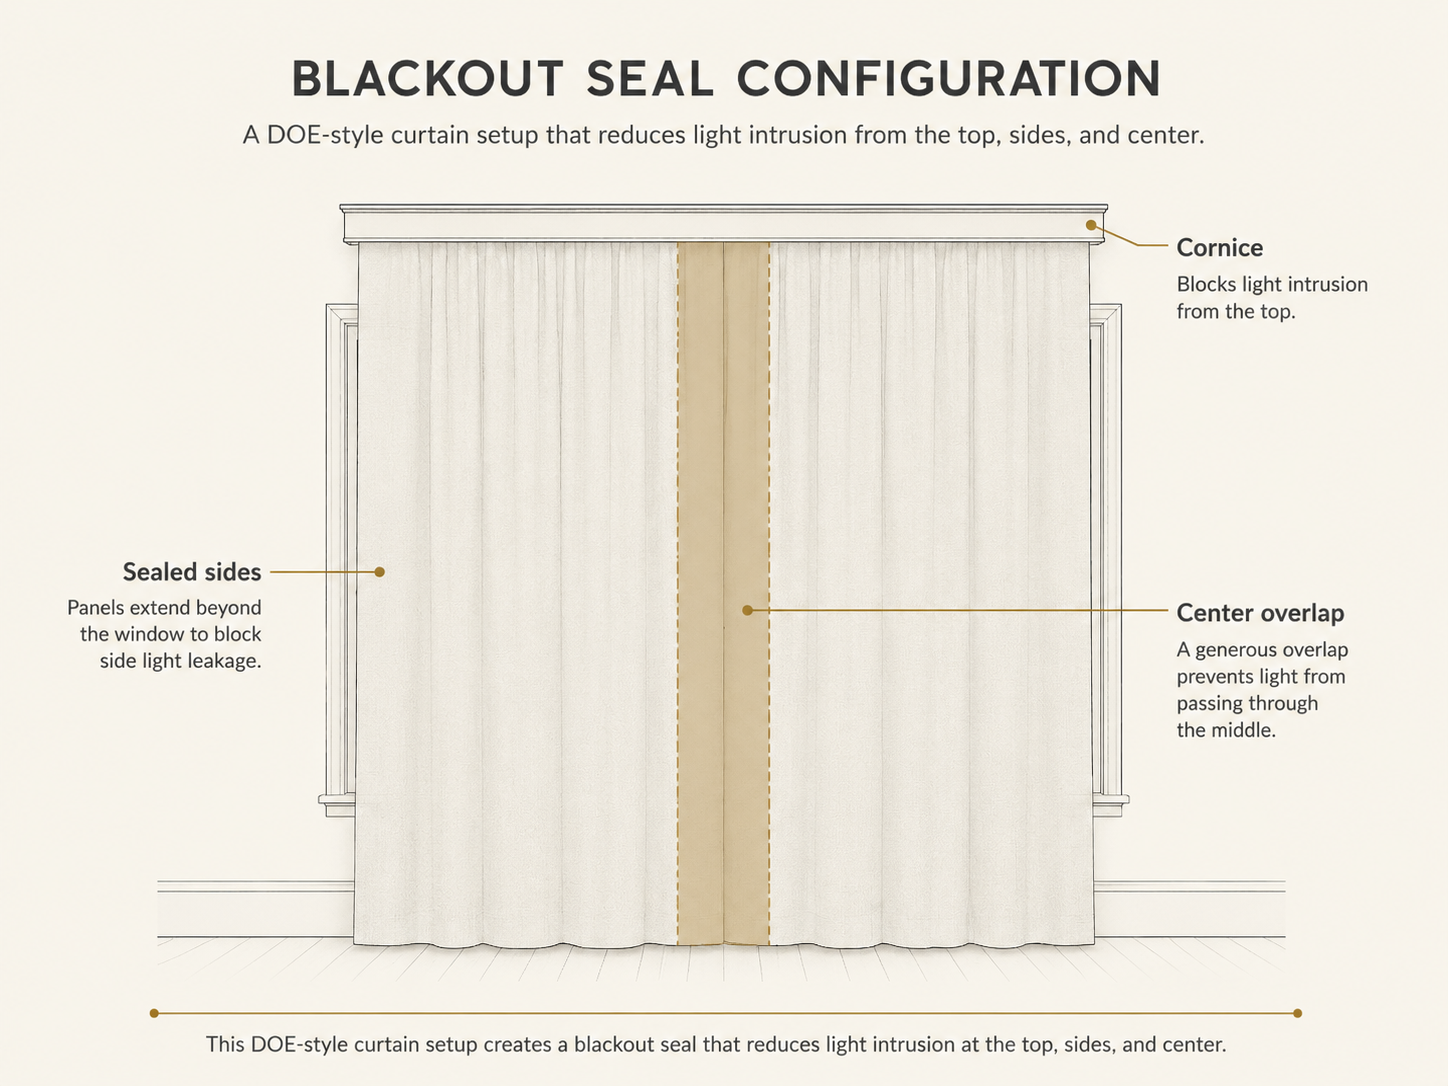
The blackout addendum, straight from the Department of Energy: closed panels should overlap at the center rather than merely meeting, and the sides should seal against the wall — the DOE’s guidance names cornices on top, sealed sides, and center overlap fixed with Velcro or tape as the configuration that earns draperies their published insulation figures. Buy wider than the math’s minimum, never narrower; extra width becomes overlap, and overlap does the blackout work.
The Blackout Curtain Size Chart
The width math above, run for the common windows — rod at standard extension, fabric at 2 times fullness, purchases in standard 52-inch panels, with metric for readers measuring in centimeters. Wider blackout extensions push each rod figure further per the rules above.
| Window width | Rod length | Total fabric at 2× | What to buy |
|---|---|---|---|
| 24 in / 61 cm | 40 in / 102 cm | 80 in / 203 cm | Two 52 in panels, generous |
| 36 in / 91 cm | 52 in / 132 cm | 104 in / 264 cm | Two 52 in panels, exact |
| 48 in / 122 cm | 64 in / 163 cm | 128 in / 325 cm | Two 66 in panels, or three 52s |
| 60 in / 152 cm | 76 in / 193 cm | 152 in / 386 cm | Three 52 in panels |
| 72 in / 183 cm | 88 in / 224 cm | 176 in / 447 cm | Two 84 in wide panels, or four 52s |
| 96 in / 244 cm | 112 in / 284 cm | 224 in / 569 cm | Two 100 in extra-wides, or four 52s |
| 107 in / 272 cm | 123 in / 312 cm | 246 in / 625 cm | Two extra-wide panels for a slider |
| 120 in / 305 cm | 136 in / 345 cm | 272 in / 691 cm | Extra-wide pair, verify stock widths |
Between configurations, wider wins — surplus width becomes center overlap and side wrap, and both work for the blackout.
The Length System
Length starts with where the curtain stops, and there are five established choices. Sill length ends just below the sill and suits kitchens and radiator walls. Apron length runs 4 to 6 inches below the sill. Floor length hovers a quarter to a half inch above the floor — the working standard for bedrooms and living rooms, polished without dragging. The break adds an inch or two of softness at the floor, and the puddle pools 2 to 6 inches of fabric — romantic in photographs, and in practice a dust collector that wears fast, best reserved for formal rooms nobody walks through. For blackout purposes, longer beats shorter: light entering under a sill-length curtain defeats the fabric above it, so blackout defaults to floor length.
| Standard length | From a rod 5 in / 13 cm above an 84 in / 213 cm frame, it reaches | Best for |
|---|---|---|
| 63 in / 160 cm | Around the sill | Kitchens, radiator walls |
| 84 in / 213 cm | Apron zone, below the sill | Casual rooms, cafe looks |
| 95–96 in / 241–244 cm | Floor hover on 8 ft ceilings | The blackout default |
| 108 in / 274 cm | Floor on 9 ft ceilings, break on 8 ft | Tall rooms, soft break |
| 120 in / 305 cm | Floor on 10 ft ceilings, puddle below | High ceilings, formal rooms |
Mount the rod 4 to 6 inches above the frame at minimum — height flatters the window and, for blackout, kills the light that would spill over the top of a low-hung panel. Under crown molding, leave 2 to 3 inches of clearance. Then match your measured drop against the standard retail lengths — 63, 84, 95 to 96, 108, and 120 inches — and when your number falls between sizes, buy the longer one and hem, which every measuring standard prefers to a curtain an inch short forever.
Where the Fabric Actually Starts: Header Offsets
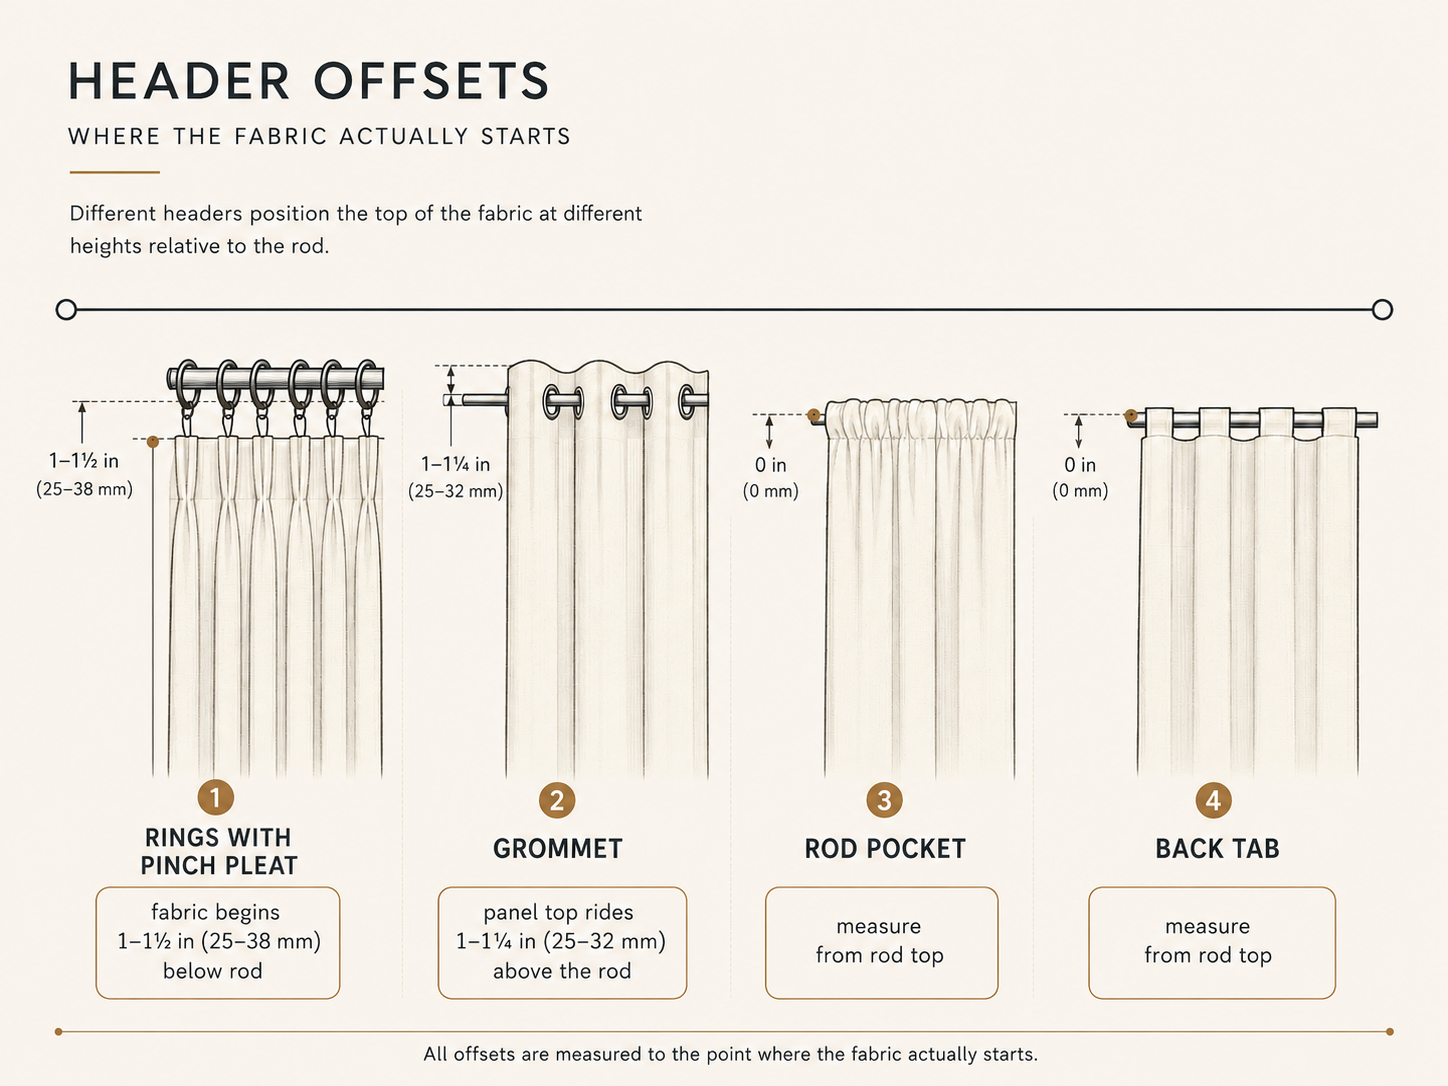
The detail most guides skip is that identical “84-inch” curtains hang at different heights depending on the header, because each header holds the fabric in a different relationship to the rod.
| Header | Fabric sits | Measuring rule |
|---|---|---|
| Grommet | Panel top rides about 1 to 1¼ inches above the grommets, so the drop below the rod runs that much shorter | Measure rod to target, then add 1 to 1¼ inches |
| Rings with pinch pleat | Fabric starts at the ring bottom, 1 to 1½ inches below the rod | Measure from the bottom of a ring |
| Rod pocket | Sits on the rod; the pocket takes about 2½ inches, and any header frill rides above without counting toward the drop | Measure from the top of the rod |
| Back tab | Sits on or just above the rod on 4-inch tabs | Measure from the top of the rod |
One more offset hides in the hardware — a thick decorative pole takes up about an inch of hang, lifting the hem accordingly. When a quarter inch of hover is the goal, the pole’s diameter belongs in the math.
One Window, Worked Start to Finish
A 36-inch-wide window, frame top at 84 inches, floor-length blackout on grommet panels. Rod: 36 plus 8 inches per side gives a 52-inch rod, mounted 5 inches above the frame. Width: 52 times 2 fullness equals 104 inches of fabric — two standard 52-inch panels, exactly. Length: rod to floor measures 89 inches; subtract a half inch of hover for 88½; add 1¼ for the grommet offset, and the target is 89¾ — so buy the 95-to-96 length and hem, and the window is done: two 52 by 95 panels, hemmed to 89¾, overlapping at center, sealed at the sides.
Frequently Asked Questions
How long should blackout curtains be?
Floor length — stopping a quarter to a half inch above the floor — from a rod mounted 4 to 6 inches above the frame. On standard 8-foot ceilings that lands on the 95-to-96-inch retail size; shorter lengths leave a lit gap below the hem that defeats the fabric above it.
How do you hang sheer and blackout curtains together?
On a double rod — sheers on the back rod closest to the glass for daytime privacy, blackout panels on the front rod doing the night work, each layer measured by its own header per the table above. The pairing earns a bonus the Department of Energy documents: two layered treatments trap a tighter air space than one, so the sheer quietly improves the blackout’s insulation.
If you are layering blackout curtains over a blind, measure the two treatments separately. Our guide to measuring for blinds and checking recess depth explains the product-specific dimensions and deductions; curtain fullness calculations do not apply to blind order widths.
What do you measure first for curtains?
The rod decision — mounting height and side extension — because every other number derives from it. Then rod length sets fabric width through the fullness multiplier, and the header sets where the length measurement starts. Window dimensions alone decide almost none of it, which is why measuring the glass first leads most people astray.
What width and length do I need for blackout curtains to fit?
Width: rod length times 2 for standard fullness, divided by two panels, buying wider when between sizes so the panels overlap at center. Length: measure from where the fabric starts on your header — the table above — to a half inch above the floor, and when the number falls between the standard lengths, buy longer and hem.
How much wider than the window should blackout curtains be?
The rod itself should extend 12 to 20 inches per side for genuine light control, and the fabric should total about twice the rod’s length. A 36-inch window ends up wearing roughly 104 inches of fabric — and that ratio closes the gaps, while the window’s own width decides only where the rod begins.
Should blackout curtains touch the floor?
They should stop a quarter to a half inch above it — full coverage without dragging. Sill-length blackout defeats itself, since light entering below the hem undoes the fabric above; floor length is the blackout default, with the puddle reserved for formal rooms that can afford its maintenance.
Do blackout curtains need to overlap in the middle?
Yes — the Department of Energy’s own window-covering guidance specifies center overlap, sealed sides, and a cornice on top as the configuration that delivers the published performance. Two panels that merely meet will part with every draft, and the gap glows.
What size curtains fit a 72-inch window?
Rod at 72 plus 8 per side gives 88 inches; times 2 fullness is 176 inches of fabric — three standard 52-inch panels, or two wide 84-inch panels for a cleaner center overlap. Length follows the same rule as any window: header offset to floor, hover half an inch, buy longer between sizes.
Resources
- U.S. Department of Energy — Energy-Efficient Window Coverings guidance
- Published retailer measuring standards — Home Depot, Dunelm, Spiffy Spools, Port & Bay, Vermont Country Store
- Architecture Lab — Best Blackout Curtains
- Architecture Lab — Best Thermal Curtains
- Architecture Lab — How to Make Blackout Curtains
- Architecture Lab — Do Blackout Curtains Keep Heat Out


This wasn’t helpful for the information I needed. I already know what kind of rod and where they will be mounted. I actually needed how to measure the window (which I can and have done), but what width and length I needed for the blackout curtains to fit.
Jackie — you were right, and this reply comes with the fix. The page told you where to put a rod you’d already mounted and skipped the one thing the title promised, so we rewrote it from zero around your question. The width and length math is now the whole article: fabric width equals rod length times two for fullness, divided by your panels, buying wider between sizes so the pair overlaps at center — plus the header-offset table most guides skip, since identical “84-inch” curtains hang at four different heights across grommet, ring, rod-pocket, and back-tab tops. A worked example runs one real window down to purchasable sizes, and your question sits in the FAQ nearly word for word. If your own numbers still don’t compute, post them here and I’ll work your window in the comments. Thanks for the push — this corner of the internet is better because you didn’t let it off the hook.